Gipfel Logbuch

Eigentlich für mich selbst aber vieleicht findet jemande eine Inspiration darin;

GipfelDatumKommentar
Heuberg / Wasserwand (1338m)13.04.2017
31.12.2022
Soinwand (1756m)10.07.2021
Hirschberg (1668m)2017/18?
Wildalpjoch (1720m)10.07.2021
Seewandköpfl (1664m)10.07.2021
Kesselwand (1721m)10.07.2021
Lacherspitztodo
Brecherpitze16.05.2020
12.09.2019
Blomberg21.08.2022
11.04.2021
09.06.2018
01.04.2016
30.03.2014
Roßstein / Buchstein10.07.2018
Rotwandkopf14.06.2017
04.08.2019
16.07.2022
Wendelstein (1838m)31.05.2021
Breitenstein (1622m)
+ Fensterl
01.10.2021
Käserwand
Wildalpjoch
Seewandköpfl
Lacherspitze
Bärenstein
10.07.2021
Rohnberg /Schliersberg30.12.2016
Taubenstein14.06.2017
04.08.2019
Stümpflingtodo
Wallberg (1722m)todo
Baumgartenscheid01.06.2014
31.12.2021
Kreuzbergköpfl01.06.2014
Gindelamlschneid01.06.2014
Hochries (1569m)03.05.2021
Farrenpoint06.2020
Rampoldplatte20.07.2020
01.06.2022
Hochsalwand01.06.2022
Reehleitenkopf26.05.2021
Kirchspitze (2312m /AT)29.08.2017
Isskogel (2263m /AT)21.08.2017
23.08.2017
Kreuzjoch (2558m /AT)24.08.2017
Riesenkopf26.06.2021
Zugspitze20.10.2012
Höllental Anger Hütte02.10.2021
16.07.2017
16.08.2016
20.10.2012
(von Eibsee über Riffelscharte)

Wank21.08.2015
Kreuzeck16.07.2017
28.09.2013
Eckbauer21.06.2015
Osterfelderkopf16.07.2017
28.09.2013
Eichenberg27.05.2017
Brocken28.05.2016
Bärenkopf (1991m / AT)todo
Hinterunnütz / Hochunnütz / Vorderunnütz
(2007m /2075m / 2078m)
todo
Dalfazer Joch (2233m)todo
Seekarspitze (2053m)todo
Ehrenbachhöhe (1802m)06.09.2010
Hahnenkamm (1712m)07.09.2008
06.09.2010
Walmendinger Horn (1996m)09.09.2011
1.10.2012
Söllereck (1706m)10.09.2011
2.10.2012
Hoher-Ifen (2230m)3.10.2012
Nebelhorn (2224m)11.10.2011
4.10.2012
Brünnsteintodo
Hochgern04.03.2023
Spitzstein13.07.2022
20.02.2023
Jägerkamp28.07.2022
Guffert03.07.2022
Hochalm25.08.2022
Lamsenjoch Hütte (über Faule Eng)12.09.2022
Gedererwand19.09.2022
Taubenberg07.10.2022
Kampenwand25.06.2022
Herzogstand30.10.2021

Tasmota 2022.01.1 with AHT10

Today i´ve reactivated my VS Code + PlatformIO setup to create new binary of Tasmota with the actual releas 9.5.0.1 2022.01.1 for my AHT10 Sensors and the MAX44009 Lux Sensors i use in some devices.

I started first by updating all regular devices with normal and sensors firmware and while only 4 devices was left i decide to give them also an all new version.

So pulled the new version from github, update the platformIO plugins, chang the 3 lines of code i also showed in a previous post and run the build.

And here it is the all new Tasmota 9.5.0.1 2022.01.1 binary with AHT10 and MAX44009 included.
Already tested on some Wemos D1 Mini.

Build with framework-arduinoespressif8266@2.7.4+9

https://github.com/crashdown79/tasmota-aht10/blob/main/tasmota.bin

https://github.com/crashdown79/tasmota-aht10/blob/main/tasmota.bin.gz

Hope you enjoy it and don´t forget to visit original Tasmota site and donate to https://github.com/arendst

Updated due to new version 2022.01.1 which is used now.

;-)

MQTT Stats via Node-Red to InfluxDB&Grafana

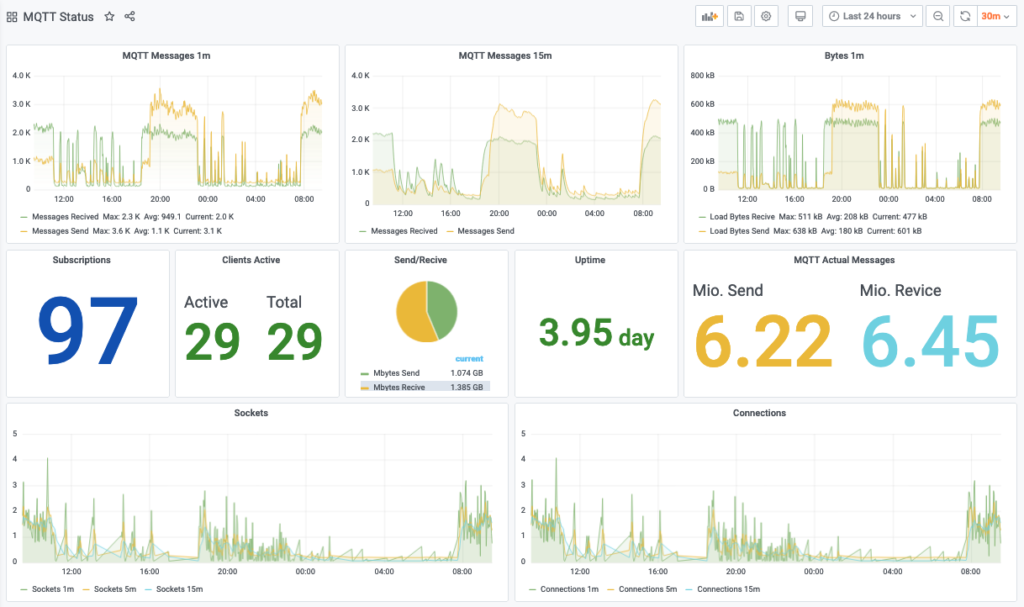
Today i want to share my way how i monitor my Mosquitto MQTT Broker.

Using the $SYS Stats from Mosquitto to visualize MQTT Stats in Grafana.
Used Tools:
– Mosquitto
-Node-Red
-InfluxDB
-Grafana

The change function:

First we have to create a subscription to the $SYS Topic to get all the statistics of the Server

What topic is for what: https://mosquitto.org/man/mosquitto-8.html

Than i change some strings to make it easier to use them in the following function. (Remove the $SYS/broker/ prefix of the topic and remove slashes also remove the suffic seconds to be able to process the uptime directly)
With the function i create a new object wich fits directly for my influxdb.

The Output of this function i forward direct in a influxdb object:

For that i created a database statistics in the influx and there i put the measurements in mqttstats

This results in a new measurement table in influx:

1612301513903060473 publishmessagesreceived 3673357
1612301513903536179 messagesreceived 4021280
1612301513903986660 bytessent 737942819
1612301513904438741 bytesreceived 855373047
1612301513904867547 publishmessagessent 3702965
1612301513905292203 publishbytessent 612137624
1612301513905668245 publishbytesreceived 744766929
1612301513906041838 loadbytessent5min 429681.23
1612301513906428743 messagessent 4043448
1612301524896645319 loadmessagesreceived1min 2117.19
1612301524897729721 loadpublishsent1min 3093.27
1612301524897729858 loadpublishreceived1min 2030.89
1612301524897807172 loadbytesreceived1min 487152.21
1612301524898050025 loadbytessent1min 613414.4
1612301524898066763 loadmessagessent1min 3176.61
1612301524898383254 loadsockets1min 1.9
1612301524918005693 loadconnections1min 1.9
1612301524918417461 loadpublishsent5min 2185.47
1612301524918807241 loadpublishreceived5min 1542.26
1612301524919121232 loadmessagessent5min 2373.57
1612301524919451424 loadmessagesreceived5min 1733.53
1612301524919749216 storemessagesbytes 6020
1612301524920027032 storemessagescount 88
1612301524920159846 messagesstored 88
1612301524920458488 loadconnections15min 1.13
1612301524920612252 loadsockets15min 1.13
1612301524920903319 loadbytessent15min 269440.39
1612301524921056546 loadbytesreceived15min 233154.23
1612301524921124734 loadpublishreceived15min 1003.03
1612301524921171072 loadpublishsent15min 1341.78
1612301524921282899 loadmessagessent15min 1551.73
1612301524921623641 loadmessagesreceived15min 1215.22
1612301524921654391 loadsockets5min 1.9

The Result in my Grafana Dashboard:

If you´ve questions or want to comment on one of my project please contact me on twitter: https://twitter.com/jarodw79

Energymeter with Gosund-SP111 and node-red2influx

node-red flow

Starting with the flow…

Prerequisits:

I assume that you´ve already installed node-red and connected it with your influxdb.
You should also have installed tasmota on your device. I´ve a Tuya device flashed with a actual Tasmota version by tuya-convert

I´ve used a Gosund SP111 for this, but you can basicaly use it with every device giving you SENSOR data. So it doesn´t matter whether you want to monitor temperature, gas, energy or other. You´ve just adapt where i used the $..ENERGY by chosing what ever your sensor provides. Other examples i use are „$..Illuminance“, „$..Pressure“, „$..Pressure“ and „$..Temperature“

Used elements:

  • MQTT in

With the MQTT in i subscribe to tele/+/SENSOR which is the default topic of tasmota for sensor values, here i make no selection what sensor values i will use so it gets every sensor type you have in your mqtt network

Here i use the JSONPath expression „$..ENERGY“ to filter only on JSON messages which includes ENERGY as a element.

  • Switch

I use the switch element to identifiy whether the supplyed element from JSONPath is empty or not.

  • Function

The function is where i add the source name within the JSON String to have that information afterwards available also in the influx measurements.

  • InfluxDB

After all i write the whole string in the influxDB in my statisitcs database in a measuremnt called „energy1“

  • DebugMsg

The DebugMsg element is to controll the output of the chain. In my environemnt this is a typical output:

[{„TotalStartTime“:“2020-05-21T19:09:01″,“Total“:1.591,“Yesterday“:0.208,“Today“:0.054,“Period“:0,“Power“:0,“ApparentPower“:17,“ReactivePower“:17,“Factor“:0.02,“Voltage“:228,“Current“:0.073″,“Name“:“energy2″}]

As you see there is the NAME added at the end of the object.

CODE:

[
{
„id“: „3a60f610.f66632“,
„type“: „jsonpath“,
„z“: „2c0c97dc.300d7“,
„expression“: „$..ENERGY“,
„split“: false,
„name“: „“,
„x“: 630,
„y“: 2080,
„wires“: [
[
„d5a418c2.d9bda8“
]
]
},
{
„id“: „d5a418c2.d9bda8“,
„type“: „switch“,
„z“: „2c0c97dc.300d7“,
„name“: „“,
„property“: „payload“,
„propertyType“: „msg“,
„rules“: [
{
„t“: „nempty“
},
{
„t“: „cont“,
„v“: „topic“,
„vt“: „msg“
},
{
„t“: „else“
}
],
„checkall“: „true“,
„repair“: false,
„outputs“: 3,
„x“: 790,
„y“: 2080,
„wires“: [
[
„e78d6b7c.6767c“
],
[],
[]
]
},
{
„id“: „e78d6b7c.6767c“,
„type“: „function“,
„z“: „2c0c97dc.300d7“,
„name“: „add name“,
„func“: „msg.payload[0].emname = msg.topic.split(\“/\“)[1];\nmsg.payload[0].Name = msg.topic.split(\“/\“)[1];\n\nreturn msg;“,
„outputs“: 1,
„noerr“: 0,
„x“: 940,
„y“: 2080,
„wires“: [
[
„76d65968.6c1568“,
„a78d055d.d1ea3“
]
]
},
{
„id“: „76d65968.6c1568“,
„type“: „influxdb out“,
„z“: „2c0c97dc.300d7“,
„influxdb“: „306f62ed.836df6“,
„name“: „Statistics“,
„measurement“: „energy1“,
„precision“: „“,
„retentionPolicy“: „“,
„x“: 1140,
„y“: 2080,
„wires“: []
},
{
„id“: „a78d055d.d1ea3“,
„type“: „debug“,
„z“: „2c0c97dc.300d7“,
„name“: „energy.raw“,
„active“: false,
„tosidebar“: true,
„console“: false,
„tostatus“: false,
„complete“: „true“,
„targetType“: „full“,
„x“: 1150,
„y“: 2040,
„wires“: []
},
{
„id“: „306f62ed.836df6“,
„type“: „influxdb“,
„z“: „“,
„hostname“: „influxdb“,
„port“: „8086“,
„protocol“: „http“,
„database“: „statistics“,
„name“: „“,
„usetls“: false,
„tls“: „“
}
]

WEMOS D1 Mini on Tasmota with AHT10 Sensor

Actual there are plenty of tutorials for thousands of sensors in IoT environment.
Due to the fact i´ve never found one for the AHT10 Sensor with Tasmota, i wrote one to share my experience with you.

Hardware preparation:

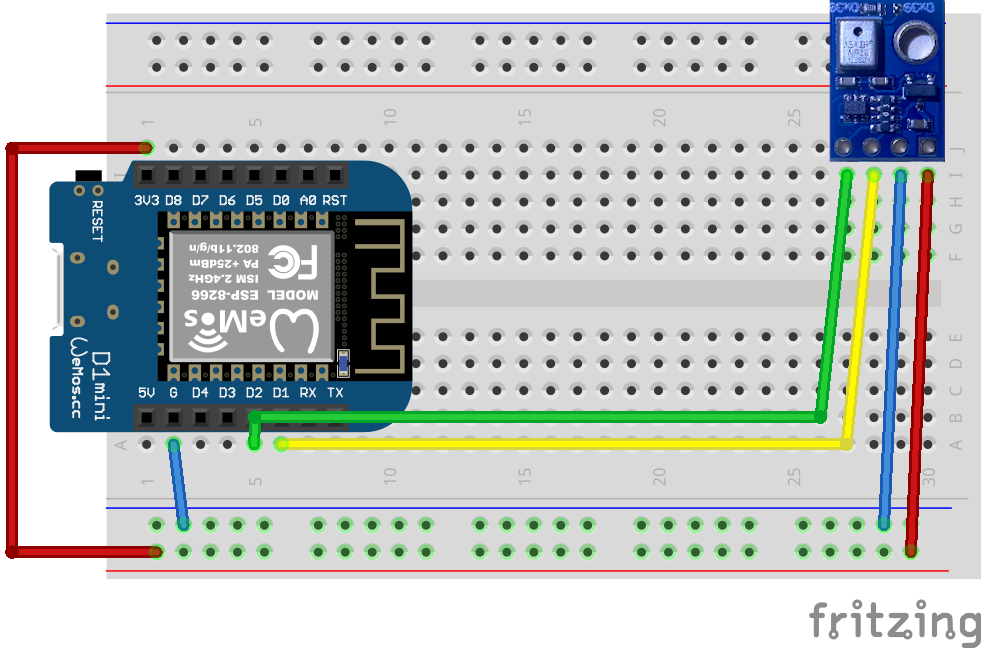
Connect AHT10 Sensor with the Wemos D1

Sensor – Wemos [color]
VIN – 3.3 V
GND – GND
SCL – D1 (GPIO5)
SDA – D2 (GPIO4)


I will directly jump to the specific task to activate the AHT10 Sensor in Tasmota.

I expect you have already installed and configured Arduino IDE oder platformIO

download Tasmota: https://github.com/arendst/Tasmota/archive/development.zip

Extract the ZIP file and open tasmota.ino in Arduino or platformIO  

Next is valid for acutal Tasmota 8.2.0.x
[Optional] Edit config:  my_user_config.h to have your wifi environment and mqtt setting directly set in the binary. If you don´t want to configure it here you can do it with a laptop or mobiel via the integrated wifi manager after booting the esp8266 the first time.

– set wifi settings
– set mqtt settings

Uncomment my_user_config.h line 496 to activate the AHT10 Sensor

The comment says only adress 0x38 but basicaly it supports 0x38 and 0x39 but for now only one sensor at a time.

Comment the following lines in the my_user_config.h out to prevent device drivers with the same ID 0x38 being active the same time.  

Dieses Bild hat ein leeres Alt-Attribut. Der Dateiname ist Bildschirmfoto-2020-05-01-um-22.45.08-1024x15.png
Line 455
Line 487

Now you can compile and transfer tasmota to your esp8266

Connect to Tasmota Page of device with http by typing the IP in your Browser:
– choose: Configuration
– than choose: Configure Module
Module Type -> Generic
– Select SDA and SCL IO from the list
– D2 GPIO4 –> I2C SDA (6) 
– D1 GPIO5 –> I2C SCL (5)

Now if you reboot your Wemos you should see actual measurements.

If your settings are correct you should also get the measurements on mqtt if activated.
So you can use your newly installed AHT10 sensor in your smart home environment.

Home network

Actual i´ll have to do an inventory of my home network. Here is a short overview of how i´ve done it till now. Due to a relocation next year i´ve to rebuild most of the network and reorganize the network structure. There for i want to establish ne zones. Today there are 3 Zones in my network:

  1. Living
  2. Basement
  3. Garage

Every zone is connected via Powerline Modules. I´ve started with Powerline in 2010 with Belkin 1000 Gigabit Kit. After some years 2 off 4 modules where defect so i switched completly to TP-LINK TL-PA8030P KIT.

The network bandwith fluctuates but i get about 600Mbit to the basement form the first floor. and about 200MBit to the garage. Thats more than enough for a HD Video stream and controlling the garage door from a Raspberry Pi.

Core of my Network is a Fritz!Box 7590 + FRITZ!WLAN Repeater 1750E and a Synology DS-916+ with 8GB RAM an 16 GB Harddrives. For the basement i use a Fritz!Box 7360SL as WiFi AP and a BlackBox SmartSwitch for all connected devices. In the garage i use a Fritz!Box 7170 for Wifi and a Raspberry PI B 2.0 for the garage door opbener and a magnetic switch sensor to get the information about the door state. I will document the garage setting in a future post when i´ll set it up on the new location.

restart …

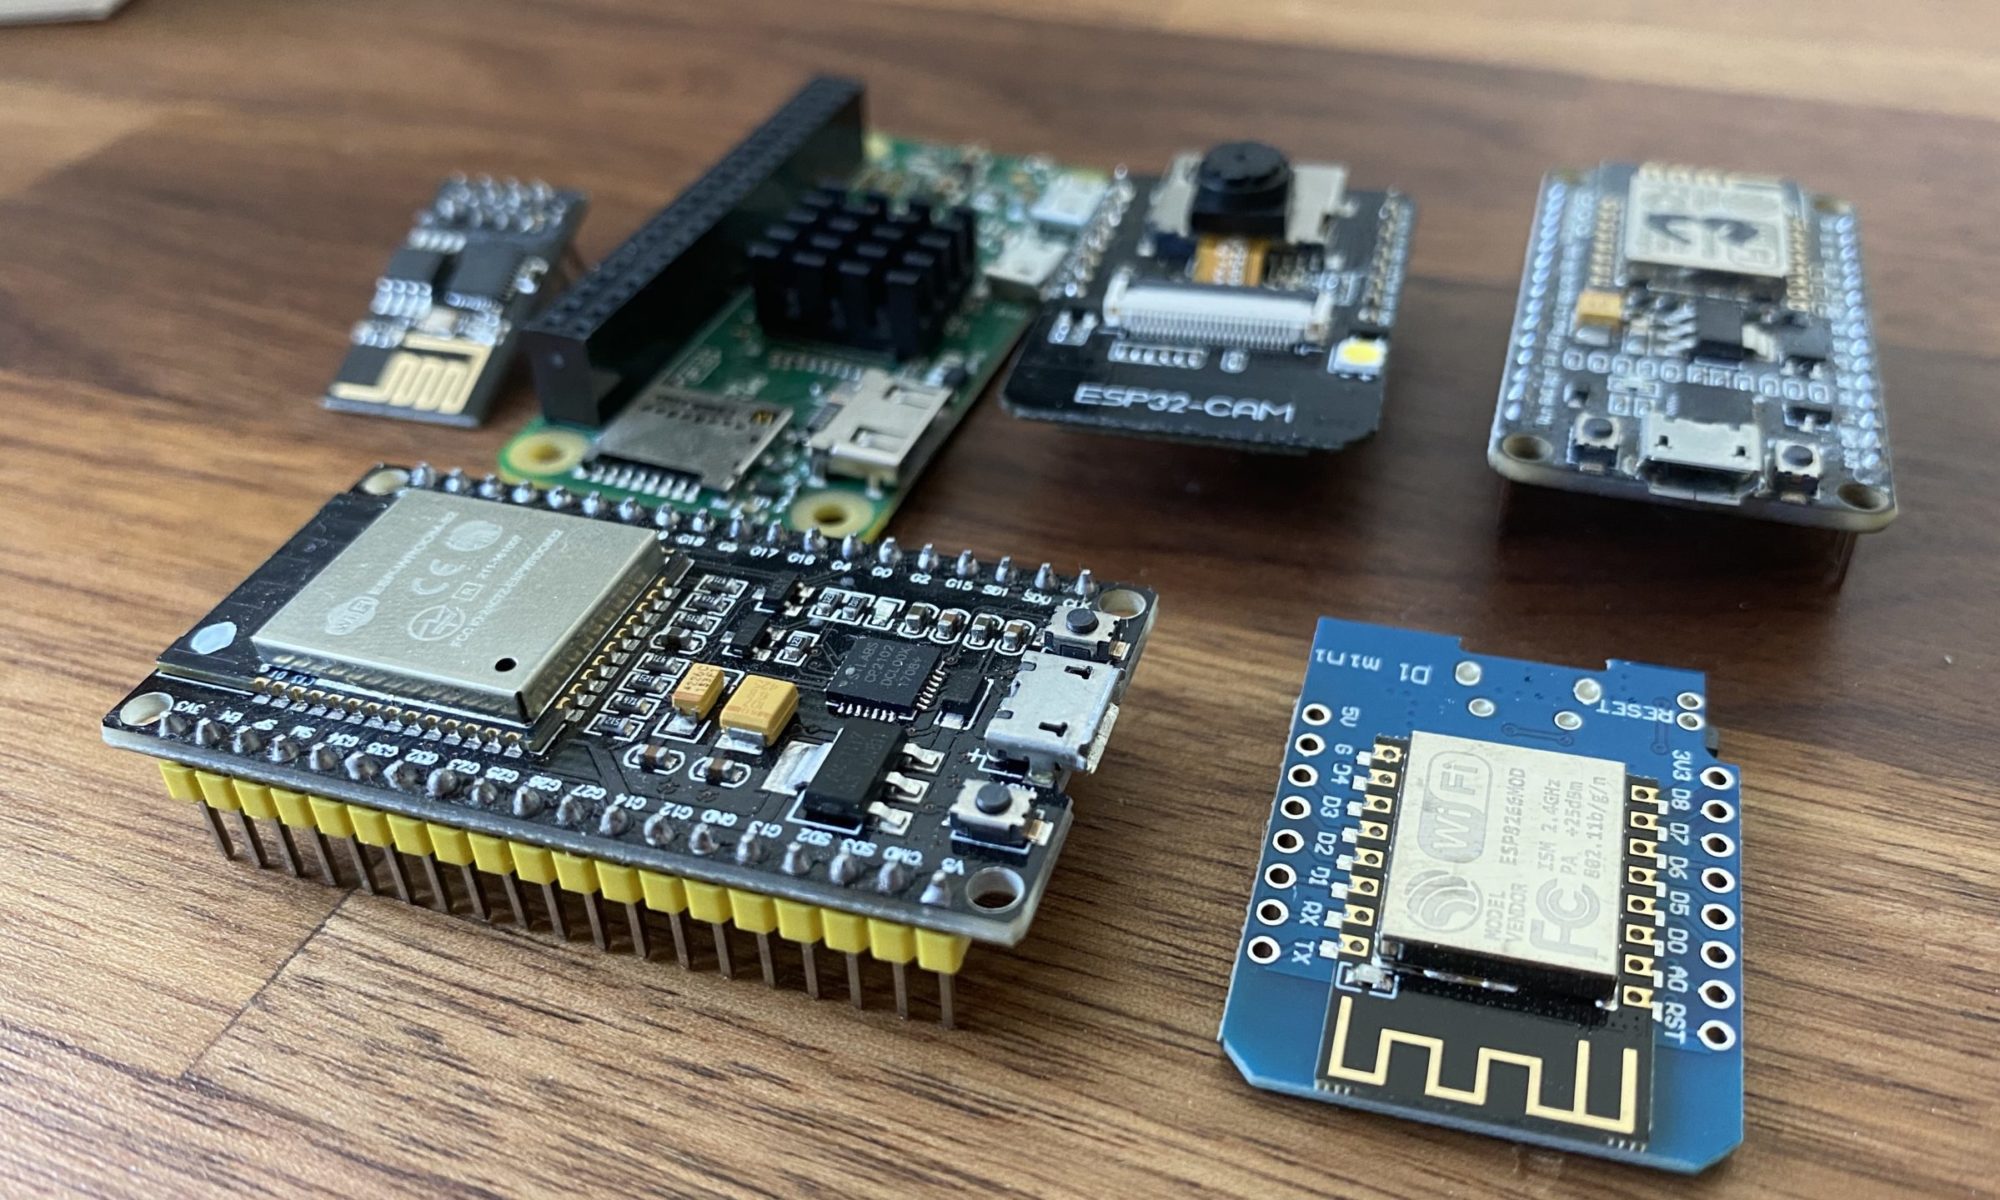
What could i start with? This will be my platform to share the projects i´ve done or doing in scope of IoT and homeautomation.

As of today i´m working with:

  • Raspberry Pi (12x)
    • Zero (1x)
    • Zero W (2x)
    • 1 Mod B (3x)
    • 2 Mod B V1.2  (2x)
    • 3 Mod B  (2x)
    • 4 – 2GB (2x)
  • ESP8266/ESP32
    • LoLin NodeMCU(3x)
    • Wemos D1 (24x)
    • Wemos Mini Pro (3x)
    • ESP-01 (5x)
    • Sonoff Baisc (1x)
    • Obi Powersocket (3x)
    • Sonoff RF Bridge (1x)
    • Ikea TradFree
    • ESP32 – HiGrow
    • ESP32 – TTGO Journal
    • ESP32 – CAM
    • ESP32 – NodeMCU
  • Sensors
    • BME280
    • BMP280
    • BMP680
    • AHT10
    • DS18B20
    • DHT22 (AM3201)
    • DHT11
    • MAX44009
    • HC-SR501 PIR
    • HC-SR04 Ultrasonic
  • Synology DS916+
    • Docker
      • Node-Red
      • OpenHab
      • Mosquitto
      • Grafana
      • Portainer
      • Telegraf